
tonycheese’s Guide
Here is the tonycheese’s guide. It covers the basics very well. So if you’re unfamiliar with the game or have never calculated before, this is the guide to start off with and just play the game for a while without calculating go get a feel for it. I left it mostly unaltered. A very big thanks to tonycheese for letting me use the guide for this blog’s purpose!
Part 1
learn to chip! a chipping guide. it’s quite simple, really (sort of):
note: this is a BEGINNER’S guide, meant for people who are just starting to learn. for those of you with a few -28s, this probably isn’t going to help you.
the little squares on the green are the same size (with a very few holes that provide exceptions, but we can ignore those for now). since they’re the same size, we can use them for a good basis of measurement.
the method you see in most videos is using the powerbar as your ruler… this method is more precise but less intuitive. for beginners it’s probably better to use the squares on the green to get started.
angles are HARD. extremely unintuitive and just hard. first learn to deal with winds that only point ====> or >>. the pin is 230 away, so you guess 1 tile per wind and aim 5 tiles (you’re going to miss, by the way). figure out what you missed by, and next time adjust (aim .9 tiles per wind, or 1.1 tiles per wind, etc). once you get a number that seems to work, write it down or remember it for that distance and try it out again next time. if you seem to get it in a lot for that distance then you’ve probably found a pretty good wind influence number. use it.
adjusting for heights is important, since they’re all over the place in this game (yes annoying, i know). just remember, going uphill you aim a little less, going downhill you aim a bit more (which makes sense right? you’re in the air less long slightly going uphill, you’re in the air longer considerably going downhill). you can figure out how height influences your wind influence yourself for now, since this is just a beginner’s guide lol.
powers:
for a lot of people, powers might be kind of non-intuitive. when hitting tomahawks above 90% (stick with above 90% for now), powers pretty much follow the percentage you hit. for example, 90% power with 240 drive would be 90% of 240 yards (240 x 0.9, or 216 yards. 95% power with 240 drive would be 95% of 240, or 228. when going downhill or uphill, you can sort of just subtract or add the height into your yardage. 230 yards +10m height = 240y power, sort of. 230 yards -10m height = 220y power, sort of. you can figure out the nuances yourself.
there, that should keep you occupied for a few weeks -_-. feel free to ask me questions HERE — not in game when i’m playing or give me input. remember: the methods i put here are pretty approximate, so you’ll only get approximate numbers from it. don’t expect to shoot -35 after learning everything in this guide.
gms, maybe uh… sticky this instead of deleting it? or let me know if there’s any offensive material and i’ll remove it (since i spent a good deal of time writing this up lol). i’m sure there are some people out there who are interested in learning but scared to ask and/or think it’s cheating.
Part 2
okay so this is for all the ppl that are past part 1 (Starting Chip-in Guide) i guess. part 1 will take a long time to work out well, so i’d suggest spending some (a lot of) time on that before moving on to this post. however, reading ahead can clear up some confusion, i guess, so maybe there are benefits to learning too much at once, who knows.
okay in the first part i talked about how slopes on the green can affect what you’re aim. this is because in overhead view, the game is representing the 3d green as a 2d flat object. to see what i mean, take a piece of paper, draw a square on it. tilt the paper to simulate a sloping green and you’ll see that the square is now more rectangular than square. this same thing can happen on the green. to adjust for it, you can simply aim a bit more or a bit less than what you see. simple enough. this effect is readily apparent on hole 2 of blue lagoon, where the green slopes to the left.
now i said in the first part that angles are unintuitive. that’s true – but they can be greatly simplified to something that ANYONE can use. this is because of the vector nature of winds – a wind can be separated into its vertical and horizontal components aka, how much it affects your power and how much it affects your aim.
(Click on the image for an enlarged view)
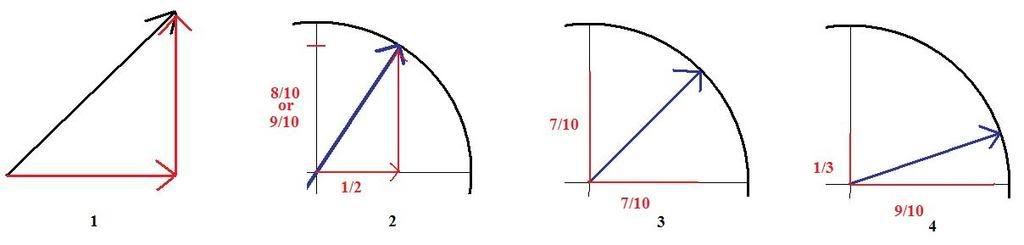
1) in the first picture, the two red arrows put together, are the EXACT SAME THING as the one black arrow. now we can use this to our advantage and come up with an easy system to guess the values of different angles on our winds. one easy value that anybody who’s taken trigonometry will know is that 30 degrees on an angle will correspond to 1/2 the wind going horizontally. how did they come up with this number?
2) well, take a look at the second diagram. again, the blue arrow can be split into the two red arrows, and they represent the EXACT SAME THING.
now if you look carefully, the bottom red arrow pointing to the right is about 1/2 the full length of where the angle can reach. the upwards-pointing red arrow is about 8/10 or 9/10 of full arrow length. this means if you had 4 wind pointing in that direction, you’d have the same as 2 wind going to your right and 3-4 wind going up (or 4×8/10 = 3.2, 4×9/10 = 3.6). this can be used for ANY ANGLE!!!!!!!!!!!!!111
the third and fourth diagrams are further examples.
3) the third angle is 45 degrees, and that’s about 7/10 of the wind going up and to the right. if the wind was 5, then you’d have about 3.5 wind going up, and 3.5 wind going to the right.
4) the fourth angle is some random angle i dunno what that is really. i just drew a line. but it doesn’t matter, we can break it down. i’d guess that’s about 9/10 going to the right, 1/3 going up. so if it was 9 wind, that’d be 8 wind going to the right (or 8.1 = 9×9/10), and 3 wind going up.
EASY RIGHT?! well, i’m pretty sure nobody shooting -35 does this, but it’s definitely a good way to start and get an intuitive feel for the angles.
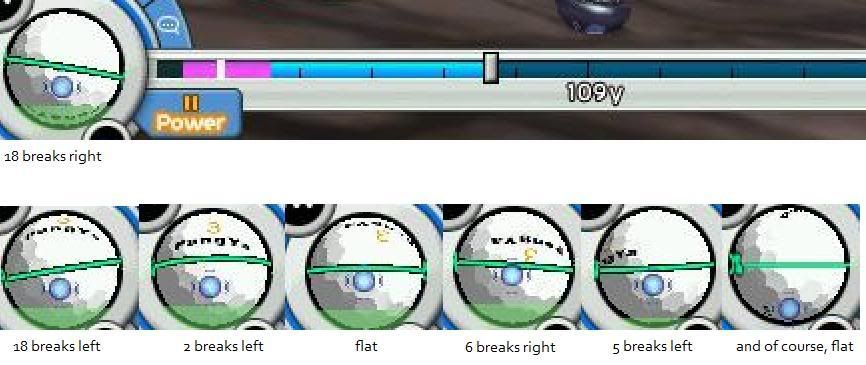
ball slopes is just opening up a whole new can of craziness. i’ll give you some general hints and if you’re motivated enough you’ll figure it out. the key to ball slopes is that you can get a definitive number from the line on your ball. when you press spacebar and just watch your ball, you’ll see that the green line gets highlighted by black. you’ll see that there are little breaks in the line if you’re not on a perfect flat. those breaks are directional, meaning some point left and some point right. they also correspond to a certain value at different distances. a good way to start is to multiply the breaks by .2 and add that to your aim (this only works accurately at about 92%, btw).
(Click on the image for an enlarged view)
Note from tonycheese: The 4th in the bottom row should be 8 breaks, NOT 6!
sorry for the extremely rough ball slopes course but that’s too hard to explain to people and i don’t want to take the time right now after doing all those angles. maybe if someone else wants to write something up and i’ll append it to this post with credit.
if my diagrams are really really unclear, sorry i can try to redo the red lines on them. again ASK IF YOU HAVE QUESTIONS! ask here, not in game when i’m playing, and i will answer reasonable questions.
Part 3
okay part three guys!
we’re gonna talk more about aiming, and focus on distance today, too.
first: an alternate system of aiming using your powerbar. you need to use the lowest resolution, 640×480 to do this. if you don’t want to take the graphics sacrifice, you can continue to use tiles and skip to the next part. personally, i also find it easier to hit pangya when in the lowest resolution.
if you watch mygo’s videos (not mine, because i use the powerbar differently) you can see how this works. your aim lines up with 50%. when you zoom fully into the green, you have a constant distance from 50-100% and from 50-0%. this distance is a bit more than a tile, about 10% more, so i would strongly suggest you redo all your numbers to match “powerbars” rather than “tiles”. now obviously you’re going to have to aim 1 powerbar at a time, so if you’re aiming 5.5 powerbar it’ll take 6 clicks total, for example. 5 full clicks and 1 half click. you’ll find this method much much more precise and accurate than tiles.
now, you still have to deal with green slopes, they haven’t disappeared. go to a sloped green and try to click, you’ll see that it doesn’t always move exactly how much you clicked. this means you’ll have to compensate… i’ll leave it to your imagination how to do that exactly. again, i point to mygo’s videos.
now the next two parts – using your whole power range for tomahawks + dealing with heights both go hand in hand.
i’ll talk about using your whole power range, first. 80%-90% tomahawks are the easiest things you’ll ever do in this game once you master them. you can misread the wind by .2 and it can still go in the hole. compare this to 100% where if you misread by more than .1 it will probably nike or miss.
a lot of people (including me at first) are put off by powers under 91% because it starts behaving really weirdly. well, you’ll probably be disappointed here but there’s really no secret to the powers. here’s what i suggest doing… find some places with little or no height and hit what you think the power would be if it behaved normally (aka, pretend you’re above 90%). you’re going to be short… but instead of throwing up your arms and going “OMG this is too hard” take note of how short you are and what power you hit. keep going at it and you’ll realize there’s a very simple pattern of how short you are depending on what power you’re at.
a good way to do this i think might be north wiz hole 1 on the ice to the left, just bring some duostar items in family mode or something. ! however, there is a very small down-height on that hole, so make sure you remember that it IS there.
heights… boy heights are hard. there are two things about heights – how they affect your power, how they affect your aim. like i said in part 1… if you are noting wind influence by power – then downhill heights have a huge effect on aim and uphill heights also have a pretty big effect on aim. if you’re doing things by distance – downhill heights have a pretty big effect on aim, and uphill heights have a very small effect on aim. you need to figure out your rules for how these heights affect your aim. but first… you have to figure out how they affect your power.
a good place to practice extreme down-heights is pretty obviously ice cannon. a lot of drops on that course. a good place to practice extreme up-heights is sepia wind. you can get pretty good numbers working with huge heights.
now the important thing to know about heights is that the effect of the height varies depending on what power you hit. i will demonstrate with one of my awesome mspaint diagrams (Click on the image to get an enlarged view):
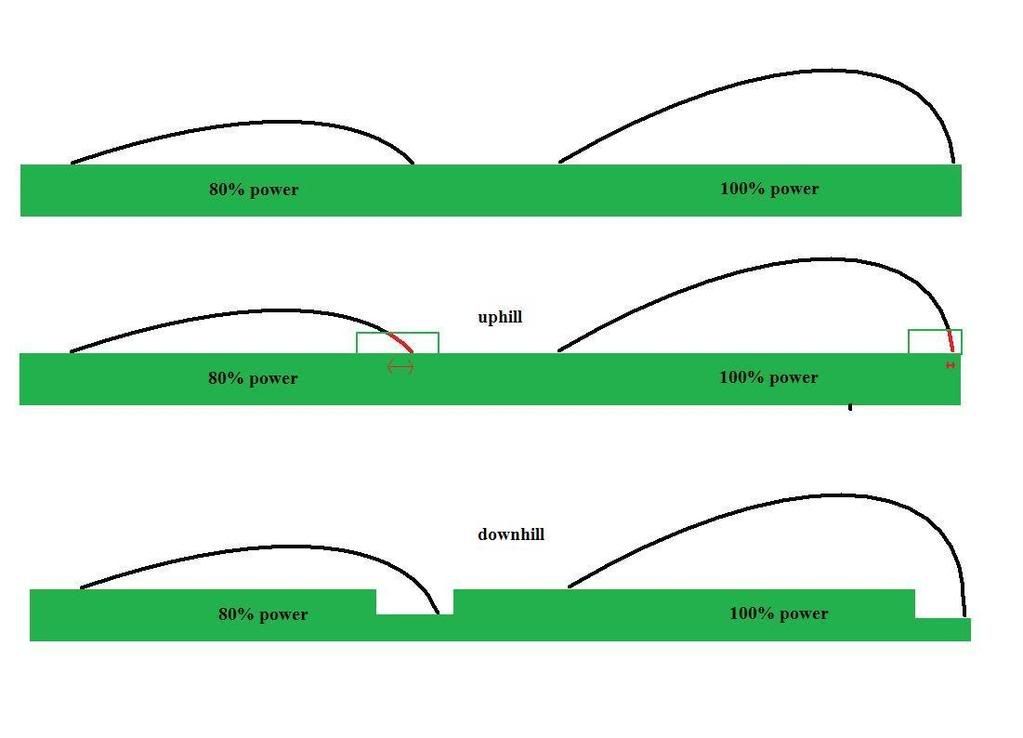
first diagram is an approximate illustration of what an 80% tomahawk looks like vs a 100% tomahawk. 80% goes lower, shorter.
second diagram, pretend the ball stops early on a transparent box that will serve as our uphill. the red part is what the path of the ball WOULD be if it flew through the ground. notice how in the 80% tomahawk, the uphill prevents quite a bit early distance-wise as compared to the 100% tomahawk, where much less distance was lost.
same thing going downhill – a lot more distance is gained in the 80% tomahawk than the 100% tomahawk for the same amount of height.
so what’s the point? there is a huge difference in how your tomahawk will treat heights from 80% to 100%. you just have to figure out that difference. again, ice cannon, sepia wind are good places to practice. to start off i would block off 91-100% as one height affect and 80-90% as another. of course, it varies with each percentage point, but that’s a good starting point until you tweak your numbers better.

It’s me Blackbird89, thank you for your guide, I will not read everything since I learn better while playing. 🙂
You’re welcome =] But I recommend reading at least the whole of tonycheese’s guide. Might clear some things up for you without telling you too much…
Hello i Love the guide i Translatet all in German if u want u can take this in ur Blog 4 German ppl…
http://rapidshare.com/files/220215086/Chippen_4_dummies.odt.html
and thx u very much..
Greez
Thank you for the effort. But the blog will stay in English. I will leave your comment here so people who want it in german can get it from that link 🙂
fantastic!!!
But
I’m not good at in English hand physics.
So I still confuse about hwi
:] no Problem im a lil bit Confused too with the Adj but with the Time i will learn More about it i try something out and Made Today my -26 Pink wind (hat)
gogo -30 ;>
This on on Rapidshare sucks after 10 Downloads Empty
Here is the Guide Again a lil Better with Power Formulas
Needed is Open Office
http://www.megaupload.com/?d=WJMCR4F0 infinity downloads FTW
oh my god!!!!!!!! thank u so so much for ur help, i am still learning well starting to lol, going to read all of this 😉 thanks a lot really appreciate.
I appreciate the wind angle greatly! I’m also glad I understand the effect of 80% v. 100% toma now. And slope… oh god :S still confuses me, but thanks!
Hello Tony!
Thanks a lot for this wonderful guide! As I said on Ntreev Forums I translated it and made a full interpretation into Spanish, then put it on my guild’s Forum http://www.espangya.com.
Everyone is starting to understand how all of this works, and soon we will be giving classes for beginners based on this intuitive method.
Thanks again! 😉
thats my head done in againe thz tony lmao
thank you for this guide… i’ve been playing pangya 4 over a month already (since i started) and i have been playing using my intuition (good thing i still scored -28 or -25)… its good to know some of it are right…